Accessing the Enclave
This guide explains how to access the CMMC Enclave using Windows 365 Cloud PCs.
Prerequisites
Before proceeding, ensure you have completed the following:
- User onboarding (credentials received & MFA setup)
- Confirmation received of appropriate roles assigned
If you haven't completed these steps, please see Initial Account Setup first.
Connecting to the Cloud PC
Accessing the CMMC Enclave is straightforward using Windows 365 Cloud PCs. Select your platform below for the appropriate instructions.
Step 1: Install Windows App
Open the Microsoft Store application on your PC and search for Windows App. Install it as shown below:

Step 2: Sign In
Once installed, open the Windows App and follow the prompts to sign in with your CMMC Enclave account, performing MFA as required.
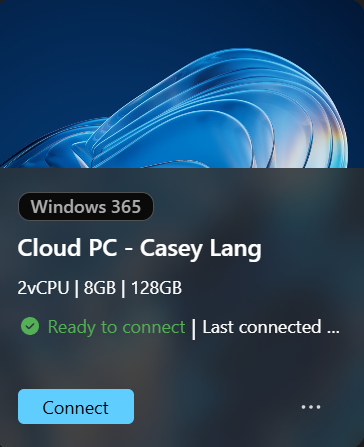
Step 3: Connect to Your Cloud PC
You should now be presented with a Cloud PC available for connection, like what is shown below:
Step 4: Start Working
Upon clicking Connect, the Remote Desktop Connection will initialize, and you will be taken into your Cloud PC to perform any required work.
GCC-High Compatibility
The standard subscription method in Windows App on macOS has known issues when connecting to GCC-High environments. The steps below use a manual workspace URL to ensure a reliable connection.
Step 1: Install Windows App
Open the App Store on your Mac and search for Windows App (by Microsoft). Install it.
Step 2: Add Workspace via URL
Once installed, open the Windows App. Rather than using the standard Subscribe option, you will need to add the workspace manually:
- Select the + (Add) button in the top-right corner of the app
- Choose Add Workspace (or Add Workspace via URL)
-
Enter the following URL when prompted:
-
Follow the prompts to sign in with your CMMC Enclave account, performing MFA as required
Step 3: Connect to Your Cloud PC
After the workspace has been added and authentication is complete, you should be presented with a Cloud PC available for connection. Click on it to begin your session.
Step 4: Start Working
The Remote Desktop Connection will initialize, and you will be taken into your Cloud PC to perform any required work.
Important Notes
Screen Capture Prevention
Screen Capture is prevented. You won't be able to screenshot or screenshare the Cloud PC via local tools.
Session Timeout
There is an idle time enforced:
- If you do not interact with the Cloud PC for 15 minutes, the session will disconnect
- After 1 hour of disconnection, the session will logout on the Cloud PC itself
Next Steps
Once connected to the Cloud PC, you can:
- Complete your required training - see Accessing the Training
- Begin working with CUI in the secure enclave environment